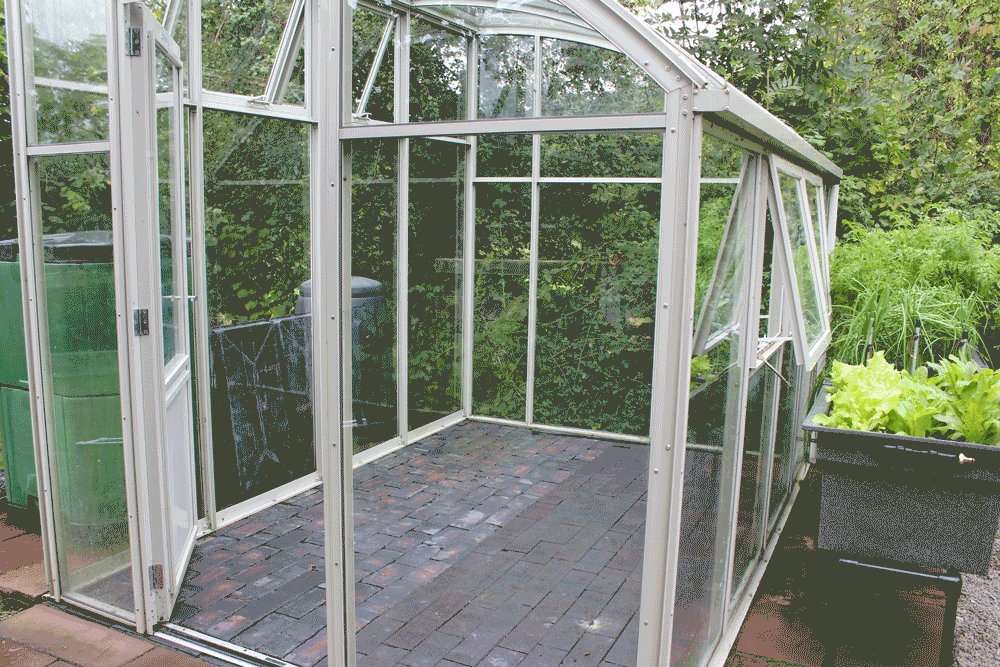
In order to receive the greatest amount of sunlight, please try to select a site facing either south, east or west. When doing so, be careful to ensure that your planter does not obstruct or impede any exit.
Your model and configuration will affect where your planter may be placed; for instance, all linear models require access from only a single side, and thus may be backed against a wall or fence.
The Four-square model requires access to a minimum of two opposing sides, so please consider this if you have a non-linear set-up.
If the planter is intended for use with a hard-plumbed timed-irrigation unit, then access to a constant water supply must also be considered.
The site surface will be preferably flat, but our system can accommodate reliefs of up to 10%. Please ensure that any/all supporting paving or cobbles are properly secured, and that any aggregate has been consolidated or removed beneath the planter legs. If intended for placement on a soft surface, then please be sure than padstones or rails are in use to provide a stable platform (planters are heavy when fully loaded!)
For guidance on the selection and installation of padstones and rails see 'Site preparation'.
If using padstones or rails on soft surfaces, then these must be set firmly into the ground to ensure proper support and stability.
Standard solid dense concrete 'breeze' blocks (215 mm width x 100 mm high x440 mm length) are well suited for use as padstones and should be installed beneath each pair of legs.
Prestressed concrete lintels (100 mm width x 65 mm high x either 3,000 mm, 2,100 or 1,500 mm) can also be used as rails to support each row of legs.
Both of the above should be installed using mortar. This assists in levelling up the base (otherwise quite difficult) and limits the risk of settlement.
Alternatively, formwork can allow for concrete rails to be cast in situ; this is the approach that we’ve always favoured at our site! Filling the channel between the two rails with soil also allows for the planting of ferns; these are brilliantly suited to the shaded space and moisture taken from the underdrainage system.
If you’d like further details about our approach to Landscaping, then please get in touch!
All planter frames are supplied flat-packed, for easy home assembly. The packs consist of pre-cut galvanised steel tubing and inter-clamp fittings. The only tool required is a hex-key, which we’ve included in the box.
Please click on the link below for the model you have purchased. Please also be aware that your planter may arrive partially assembled for transit purposes; however, still be sure to follow all guidance on assembly as sequencing is very important, and minor tweaks will most likely be required for your frame to fit comfortably on your chosen surface.


Note: For all planters produced after the 1st of January, 2020, models will now be supplied with half-length "long bars" and a strengthing cross-member; this allows us to use local delivery carriers, as well as provide free shipping! Assembly is just as easy, and involves simply joining your 'long bars' using your inward-facing "T" pieces, then connecting these with your strengthing cross member (this arrives fully assembled so that it's easy to understand!) Updated PDF set-up instructions can be found, here.
As a point of safety, please take care when handling the steel tube as the cut edges may be sharp; they may also occasionally contain ‘swarthe’ (minute fragments of metal), although we have taken great care to ensure this is unlikely!
Care should also be taken to ensure the “set screws” run into the fitting correctly, without becoming cross-threaded and difficult to turn.
If this does occur, it is likely due to poor alignment of the threads (in which case try twisting gently, with the threads positioned carefully), or where the powder coating has left a small amount of residue; in both cases, a lubricant such as WD40 may prove helpful.
Once you’ve assembled your frame, place your empty container on top of it. These come pre-drilled for your convenience, allowing irrigation components to be easily fitted.
The logo on the face on your container should face outwards (towards where you’ll be standing), and the container with the largest holes should be placed on the end of the row (this is where your inlet manifold plugs in). All other containers should be similarly placed with the logos facing towards you.
After placing your containers securely, push them tightly together along the row until they abut (contact with) the corner fittings of the frame; this allows for the irrigation system to be properly fitted – as explained in Irrigation Set-up.
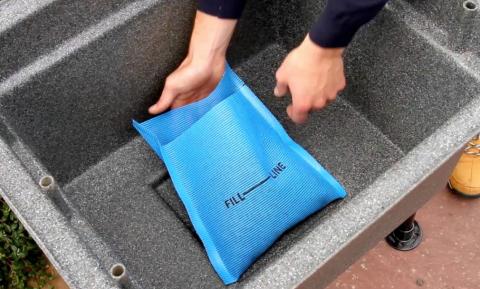
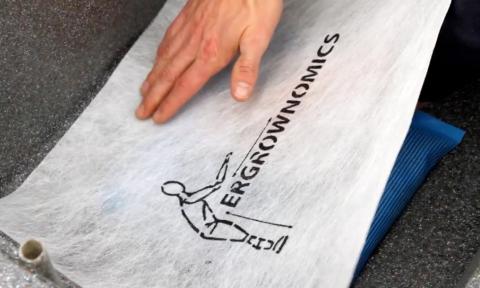
Our drainage system comprises of two parts: a heavy-duty mesh bag, and a geotextile membrane panel.
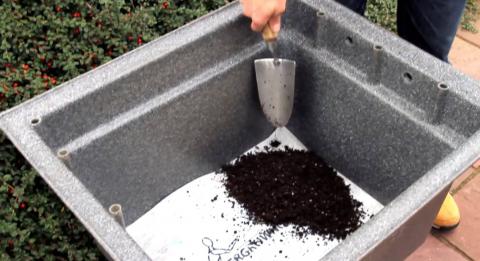
Firstly, fill your mesh bag. The mesh bags should be part-filled with drainage stone 10-15 mm in diameter (but any permeable material will suffice), and placed in the sump of each container. The bag should be ‘patted down’ to distribute the stone evenly to all four corners so that on completion the top of the bag is level with the base surface. The bag “flap” should be folded over the mouth, and the geo-textile panel placed into the container to cover the base surface (logo facing upwards). A small quantity of the soil-based growing media should be placed over the panel to weight it down, and hold it in position.
Detailed guidance on preparing your soil-based growing media can be found in your Owner’s Area; once you’ve prepared this, it’s time to fill your containers! Containers should be placed upon their supporting frame before being filled, and orientated so that the Ergrownomic logo faces outwards (towards where you’ll stand!) The containers are always pre-drilled so that the irrigation manifold is accessible from the side. The container with the larger holes to receive the irrigation manifold should therefore be placed as the ‘front’ container, and not trapped between two units.
Once your drainage set-up is established, a first layer of soil-based growing media should be placed in the container using a trowel; this should be around 10-12 cm thick. This should then be lightly consolidated using the palm of the hand. The process should be repeated a second and third time. The soil level should, on completion, be level with the pre-drilled holes at each end of containers.
Any clumps of soil and compost identified in the course of filling containers should either be broken up, or (if too hard and resistant) removed and discarded. Any stones, rootlets and debris should also be removed as-and-when encountered.
The soils should be watered using a watering can until such time as water flows freely from the drainage holes in the container sump. This will promote the collapse of larger voids, whereupon the soil-based growing media can be topped up back level with the predrilled holes. The process should be repeated twice to ensure that your container is properly filled, and the soil not likely to collapse under the next rain!
The irrigation system should not be installed until the containers are filled with soils.
The tightness of the hexagonal nuts in clamps on the frame should be checked after the frame is loaded with the soil-filled container, and adjusted accordingly with any splaying of the supports corrected (these can be tapped gently back using a rubber mallet or similar); they should not be kicked into place as this does not provide the necessary sensitive adjustment!
Our irrigation set up is straightforward, but be sure to pay close attention to the sequencing. Before commencing please ensure that the containers are pushed tight together so that there is no gap between each one, this makes life a lot easier!
The irrigation system is pre-assembled and consists of a manifold unit with brass Hozelock connector and two drip-irrigation pipes. The length of these depends upon the planter model you have chosen. It is a good idea to unfurl and straighten these as best you can before installation. The drip irrigation pipes have end stops installed and are supplied with a pair of loose ratchet clamps (you’ll find these loose within your mesh drainage bag!)
Begin by threading the drip irrigation pipes through the pre-drilled holes in the containers (the "stopped" ends will be at the opposite side to your manifold, so you'll thread the "open" ends through first). Start with the last container and work your way to the front container. This has large holes pre-drilled for the manifold unit, and should be accessible (not trapped between two containers). Take care to avoid soil entering the pipes.
Unscrew the brown threaded covers on the two ends of the manifold units and remove the green inserts. Next, place the threaded covers on the pipes (ensure they are the right way around) and press the green inserts into the end of the irrigation lines.
Now, place the manifold into the front container. This can go either way around but the Hozelock tap connector should point in the direction of your hosepipe (for obvious reasons!) Next, pull the first drip-irrigation line taut, and place the green insert into the connector; now, pull the cover forward and thread this onto the manifold, taking care to ensure the threads are correctly aligned. Repeat for the second line and tighten both fully (rubber gloves can help if you are struggling). Ensure that the drippers on the irrigation pipe are facing upwards on completion. This is really important as they must not be in direct contact with the soil!
Now that your lines are fastened, you can now attach the ratchet tube clamps onto the stoppered ends of the drip irrigation pipes. The clamps should be positioned on the second or third ring of the barbed plugs, which you can feel through the pipe. The clamps snap into position but require reasonable force. The clamp can be released by pulling one side sideways from the other, if you are not happy with your first attempt.
Now that the lines are installed properly, pull the last container out towards the end of the frame and position all others evenly between the front and last container, ensuring the gap between each is consistent. The ratchet clamp should rest against the wall of the last container on completion, so the drip irrigation pipes stay taut.
With the drip irrigation pipes in position, it will be necessary to top up the soil-based growing media again (guidance on Growing Media set-up is provided in your Owner’s Area!) The finished soil level should be half way up the side of the irrigation line. The soil surface must also be level across the container.
To prime the system, simply plug in you hose to the connector and switch on the tap. There will be some spluttering to start, as air is expelled from the system but a small steady flow of water should be identifiable at each dripper shortly afterwards. The drippers are each calibrated to supply 2.3 litres of water per hour. There is no difference in flow rate between the first and last dripper on each pipe as each contains a 'pressure compensating emitting' that regulates flow.
The drippers are positioned within each container to optimise the wetting pattern, and form concentric circles around each dripper. The newly prepared soil based growing media is unlikely to be particularly effective in transmitting water laterally (initially), and water will almost certainly flow from the base of the container before the surface is fully wetted. Don't worry about this, as surface wetting is misleading and the wetting below the surface will certainly extend further. The wetting pattern will also improve as the soils develop in situ. In the intervening period, it is recommended that newly sown seeds and root-trainers are watered at least every other day to assist establishment (using a fine rose). Alternatively, a seed mix dressing can be applied across the surface which assists greatly in achieving full wetting. Once established, using your irrigation system for approximately 15 minutes every other day will be fine (in general) to maintain an optimum moisture content (although this is just a general rule of thumb, and will depend more specifically on rainfall, temperature, and quality of growing media/soil type). More information on watering and irrigation can be found in Beginners Guides.
Congratulations, your planter is now ready to bring you years of reliable use!